


Laptop / Kindle / I-Pad Sleeve Tutorial

This pattern can be made for any size laptop, Kindle, or I-Pad by adjusting the measurements accordingly. I used girly fabric here, but you could definitely make this more "manly" by using a more masculine print or perhaps even some wool suiting material.
Este modelo pode ser feito para qualquer computador portátil, Kindle, ou I-Pad, ajustando as medições em conformidade. Eu usei aqui um tecido feminino, mas você podera fazer isso mais "viril" usando uma impressão mais masculina ou talvez até mesmo algum material adequando lã.
Supplies: Material
Cotton fabric for exterior Tecido de algodão para a parte externa
Fleece fabric for lining Tecido para forro (feltro, soft)
2 buttons 2 botões
Sewing machine Máquina de costura
Seam-ripper Abridor de casa
Thread Linha
Iron Ferro
Ironing board Tábua de passar
Fray Check (optional)
Fabric marking pen, chalk or pencil Marcador de tecido, giz de tecido
Instructions: Instruções

1. Gather your supplies.
Reuna seus materiais

2. Determine the sizing for your laptop sleeve. First, measure the height of your laptop.
Determinar o dimensionamento para o seu laptop. Primeiro, meça a altura do seu laptop.
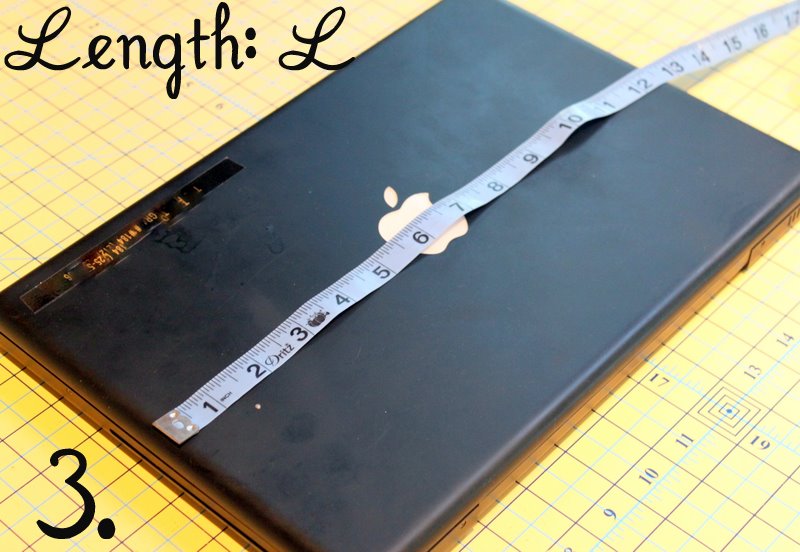
3. Next measure the length.
Meça a altura

4. Finally measure the width.
Finalmente medir a largura
Once you have these measurements you can determine your pattern size. Here is how you calculate your dimensions for the large fabric pieces (interior and exterior): (L + H + 1) X (W + H + 1). For example, my laptop was 9 inches wide (W), 12.75 inches long (L), and 1.25 inches tall (H), so my calculation was (12.75 + 1.25 + 1) X (9 + 1.25 + 1) = 15 X 11.25. I cut my interior and exterior fabric pieces 15" X 11.25" (4 pieces total).
Depois de ter essas medidas você pode determinar o seu tamanho padrão. Aqui está como você calcular suas dimensões para os grandes pedaços de tecido (interior e exterior): (L + H + 1) X (W + H + 1). Por exemplo, o meu laptop foi de 9 polegadas de largura (W), 12,75 cm de comprimento (L) e 1,25 cm de altura (H), por isso o meu cálculo foi (12,75 + 1,25 + 1) X (9 + 1,25 + 1) = 15 X 11.25. Eu cortei meu interior e peças exteriores de tecido de 15 "x 11,25" (4 peças total).

5. For the straps, draw a pattern for yourself (freehand) on a piece of paper and use this as a template. These straps are 2.5 inches wide by 7.5 inches tall (up to the very top of the curve). Cut two from the exterior fabric and two from the fleece (lining). Place exterior fabric right-side down on top of your lining (fleece).
Para as alças, desenhar um modelo ( a mão livre) em um pedaço de papel . Essas tiras são 2,5 polegadas de largura por 7,5 cm de altura (até o topo da curva). Cortar duas no tecido exterior e duas no feltro (forro). Colocar o tecido exterior do lado direito em cima do seu revestimento (lã).

6. Stitch along both long sides and the curved top, leaving the bottom open (1/4" seam allowance).
Costurar ao longo das alças , deixando o fundo aberto (1/4 "para a costura).

7. Here are both of your straps after stitching them together.
Aqui estão as duas alças já costuradas

8. Trim the excess fabric off around the curve. This will help it to lay nice and flat.
Apare o excesso de tecido em torno de fora da curva.

9. Turn both straps right-side out.
Desvire ambas as tiras para lado direito

10. Press with a hot iron.
Passe a ferro

11. Here are both straps after pressing.
Aqui estão as duas cintas após pressionando ..

12. Top-stitch on both long sides and the curved top (1/8" seam allowance). Do this in a coordinating thread
Fazer um costura no contorno.

13. Here are both straps after top-stitching.

14. Attach the button hole foot to your sewing machine.
Fixe o pé de caseado para sua máquina de costura.

15. Prepare to sew a button hole in each strap (according to your machines directions). Start button hole 1/2" from the end of the strap. Make it as big or as small as you need, depending on the buttons you have chosen to use.
Prepare-se para fazer a casa en cada tira (de acordo com as instruções de suas máquinas). Comece casa do botão 1/2 "a partir do final da tira. Fazer a casa de acordo com o tamanho do botão

16. Here is the completed button hole.
Aqui esta a casa pronta.

17. Now it's time to open both button holes.
Agora abra a casa com abridor próprio

18. Take your seam-ripper and open the inside of both button holes.

19. Use Fray Check on each button hole after opening. This is entirely optional, but it really helps to prevent any additional fraying.
Use cola de tcido para a casa não desfiar.

20. Pin both sides of your exterior fabric right-sides together. Pin the two long sides and one short side.
Alfinete ambos os lados do seu tecido exterior direito com direito juntos. Alfinete os dois lados longos e um lado curto

21. Stitch all three sides (1/2" seam allowance)
Costure os tres lados

22. Here is your exterior fabric after sewing all three sides.
Aqui esta o trabalho costurado.

23. It is important to remove the extra fabric in the two corners.
É importante remover o excesso de tecido nos dois cantos.

24. Clip both corners to remove any extra bulk from the fabric
Corte ambos os cantos para remover qualquer volume em oexcesso do tecido.

25. Turn right-side out and press.
Vire para o direito e passe a ferro

26. Pin the straps into place. Line up the raw edge of the strap with the raw edge of the exterior fabric. Alfinete as tiras no lugar. Alinhar a bordado tecido exterior. Medir em aproximadamente 1,5 "de cada lado.

27. Baste straps into place. Set machine stitch length to 3.5 and stitch along the edge (1/4" seam allowance).
Alinhave tiras no lugar. Defina o comprimento do ponto máquina para 3,5 ponto e ao longo da borda (1/4 "costura)

28. Pin both long sides of fleece (lining) together
.Alfinete ambos os lados ao longo de feltro (revestimento) em conjunto.

29. Stitch down both long sides (1/2" seam allowance). Stitch part of one short-side together, but leave an opening in the middle.
Costurar de ambos os lados (1/2 "margem de costura). Parte do ponto de um lado curto juntos, mas deixar uma abertura no meio

30. Make sure to only stitch in about 1/3 of the way on the short side of the fleece. The opening needs to be in the middle for you to be able to turn the laptop sleeve later. Clip the corners to remove bulk.
Certifique-se de costurar somente em cerca de 1/3 do caminho no lado curto do feltro. A abertura tem de ser no meio para você ser capaz desvirar mais tarde. Corte os cantos para remover o excesso de tecido.

31. Feed the exterior fabric in through the hole in the fleece
Desvirar o tecido exterior através do orifício.

32. Line up the raw edge of the exterior fabric and the raw edge of the fleece. Pin in place, right-sides together
.Alinhe a borda do tecido exterior e a borda do forro. Alfinetar no lugar, direito com direito.

33. Stitch around the top (1/2" seam allowance)
.Costure ao redor do topo (1/2 "margem de costura).

34. Here is the laptop sleeve after you have stitched around the top.
Aqui está o laptop depois de ter sido costurado em torno do topo.

35. Now pull the exterior fabric back through the hole you left open in the fleece
.Agora puxe o tecido exterior de volta através do buraco que você deixou em aberto na lã.

36. Turn the fleece right-side out as well
.Vire o forro para também.

37. Here is the hole that was left open in the bottom of the fleece lining
.Aqui esta o buraco que foi deixado em aberto na parte inferior do forro .

38. Close the hole by slip-stitching it closed by hand.
Costure a mão

39. This is the lining completely closed. Tuck the lining into the exterior fabric. Work the corners from the interior and exterior fabric into one another.
Este é o revestimento completamente fechado.

40. Top-stitch around the top opening. Use a coordinating thread (1/2" seam allowance).
Faça um ponto-em torno na abertura superior. Use um fio de coordenação (1/2 "margem de costura).

41. If you would like to sew on your personal clothing label, do so at this time. I placed mine on the back-side in between the two straps.
Se você gostar de costurar sua marca de roupa pessoal, fazê-lo neste momento. Eu coloquei o meu na parte de trás do lado, entre as duas correias.

42. Fold over both straps.
Dobre as duas tiras.

43. Using a fabric marking pen, chalk or pencil, mark your button placement. Stitch by machine or hand-sew buttons into place
Usando uma caneta de tecido, giz , lápis, marcar a sua colocação de botão. Costure à máquina ou à mão costurar botões no lugar.


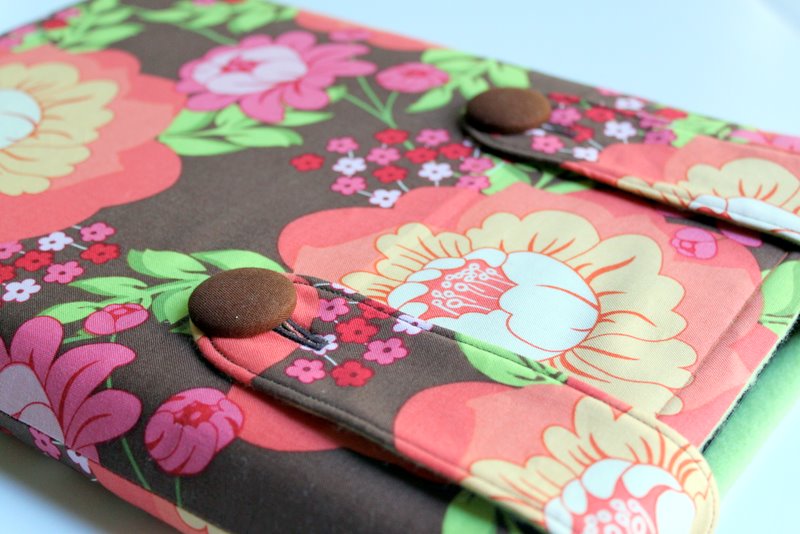
Slide your laptop into the sleeve, button the straps and you will be toting your laptop in complete and ultimate style!
Peça Pronta!
Peça Pronta!